
Introduction to Sunshine Bliss Bars
Why Sunshine Bliss Bars are the Perfect Treat for Young Professionals
If you're a young professional navigating the hustle and bustle of work and life, finding a quick pick-me-up can be a game changer. Enter Sunshine Bliss Bars, a delightful treat that brings a little joy to your day without demanding too much of your time in the kitchen. With a prep time of just 20 minutes and a bake time of around 50 minutes, these bars allow you to indulge without a long wait.
Imagine sinking your teeth into a sweet, pineapple-infused filling, nestled between layers of buttery, crumbly crust. Each bite is a reminder that life is about savoring the sweet moments—even on your busiest days. The best part? These bars are easily transported, making them ideal for home, work, or a picnic in the park.
In addition to being delicious, Sunshine Bliss Bars make for a perfect treat to share. Whether you're hosting a gathering or simply want to brighten up a coworker's day, these bars are sure to be a hit. Plus, they can be made ahead and stored, offering a tasty option when you’re low on time. Curious about the recipe? Let’s dive in!
Ingredients for Sunshine Bliss Bars
Creating Sunshine Bliss Bars is all about combining simple, wholesome ingredients that come together to create a piece of paradise in every bite. Let’s break down what you'll need for both the crust and the delightful pineapple filling.
For the Crust and Topping
To start, you’ll need the following ingredients for the crust:
- Unsalted butter (1 ½ sticks or 12 tablespoons), melted and slightly cooled – this adds richness to our bars.
- Vanilla extract (1 teaspoon) – it provides a warm and sweet flavor that enhances the overall taste.
- Kosher salt (¾ teaspoon) – balancing the sweetness.
- All-purpose flour (2 cups) – the foundation of our crust.
- Granulated sugar (½ cup) – for that touch of sweetness.
- Baking powder (¾ teaspoon) – helping our crust rise and stay light.
For the Pineapple Filling
Now, let's move on to that vibrant pineapple filling:
- Crushed pineapple (1 can, 20 ounces) in 100% juice – this is what gives our bars that burst of tropical flavor.
- Granulated sugar (½ cup) – enhancing the natural sweetness of the pineapple.
- Cornstarch (3 tablespoons) – a thickener to help set the filling.
- Kosher salt (¼ teaspoon) – another crucial ingredient for balance.
- Powdered sugar – for a light dusting before serving, adding a beautiful finish.
So, gather these ingredients and get ready to whip up some Sunshine Bliss Bars that are sure to brighten anyone's day! For an extra touch, consider checking out more tips on using fresh ingredients or exploring variations of this delightful treat on Food Network.
Preparing Sunshine Bliss Bars
Getting ready to whip up a batch of Sunshine Bliss Bars is not just about cooking—it's an experience filled with sweet anticipation and delicious aromas wafting through your kitchen. Let’s dive into the process with these easy-to-follow steps to ensure you’re set for success!
Gather all your ingredients
Before you start, it’s essential to have all your ingredients at hand. This not only makes cooking smoother but also minimizes the risk of forgetting something crucial. You will need:
-
For the crust and topping:
-
1 ½ sticks (12 tablespoons) unsalted butter, melted and cooled slightly
-
1 teaspoon vanilla extract
-
¾ teaspoon kosher salt
-
2 cups all-purpose flour
-
½ cup granulated sugar
-
¾ teaspoon baking powder
-
For the pineapple filling:
-
1 (20-ounce) can crushed pineapple in 100% juice
-
½ cup granulated sugar
-
3 tablespoons cornstarch
-
¼ teaspoon kosher salt
-
Powdered sugar, for dusting
Make sure to check out this informative article on ingredient substitutions to help you if you're missing anything!
Make the crust
Now that you have everything laid out, let’s get started with the crust, which is the base of your Sunshine Bliss Bars. Preheat your oven to 350°F and prepare an 8x8-inch baking pan. Lining it with parchment paper in a crisscross fashion will make it easy to lift the bars out later.
In a large bowl, mix the melted butter, vanilla extract, and salt. Then, slowly incorporate the flour, granulated sugar, and baking powder until a soft dough forms. Set aside ¾ cup of this dough for the topping, and press the rest evenly into the bottom of your pan. Bake for about 17-20 minutes, until it’s golden brown and dry to the touch.
Prepare the pineapple filling
While the crust cools, let’s focus on that delightful pineapple filling. Increase your oven temperature to 375°F. Drain the crushed pineapple, pressing down to remove excess liquid; this ensures a perfect consistency. In the bowl you previously used (no need to clean!), combine the squeezed pineapple with granulated sugar, cornstarch, and salt until everything is well mixed.
Assemble the bars
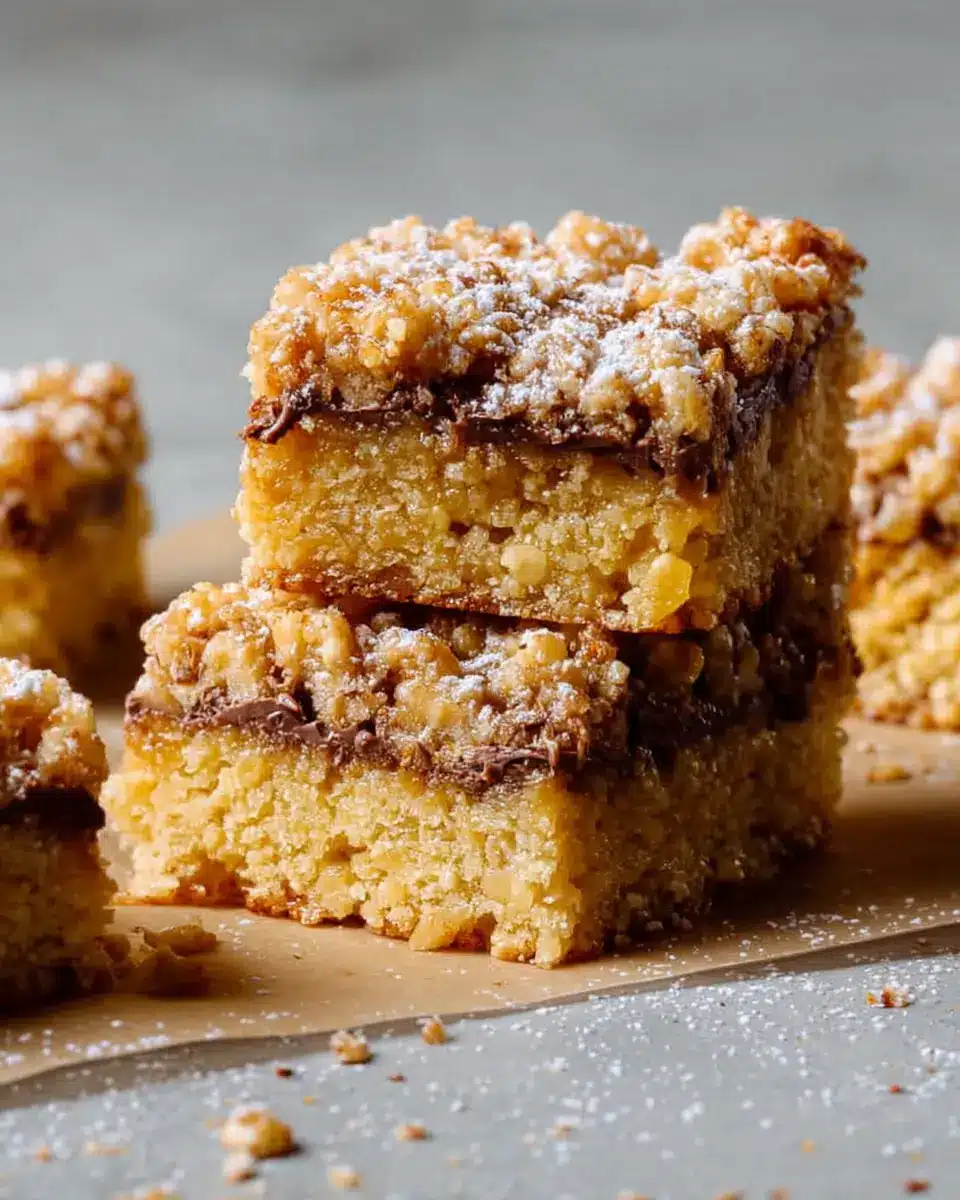
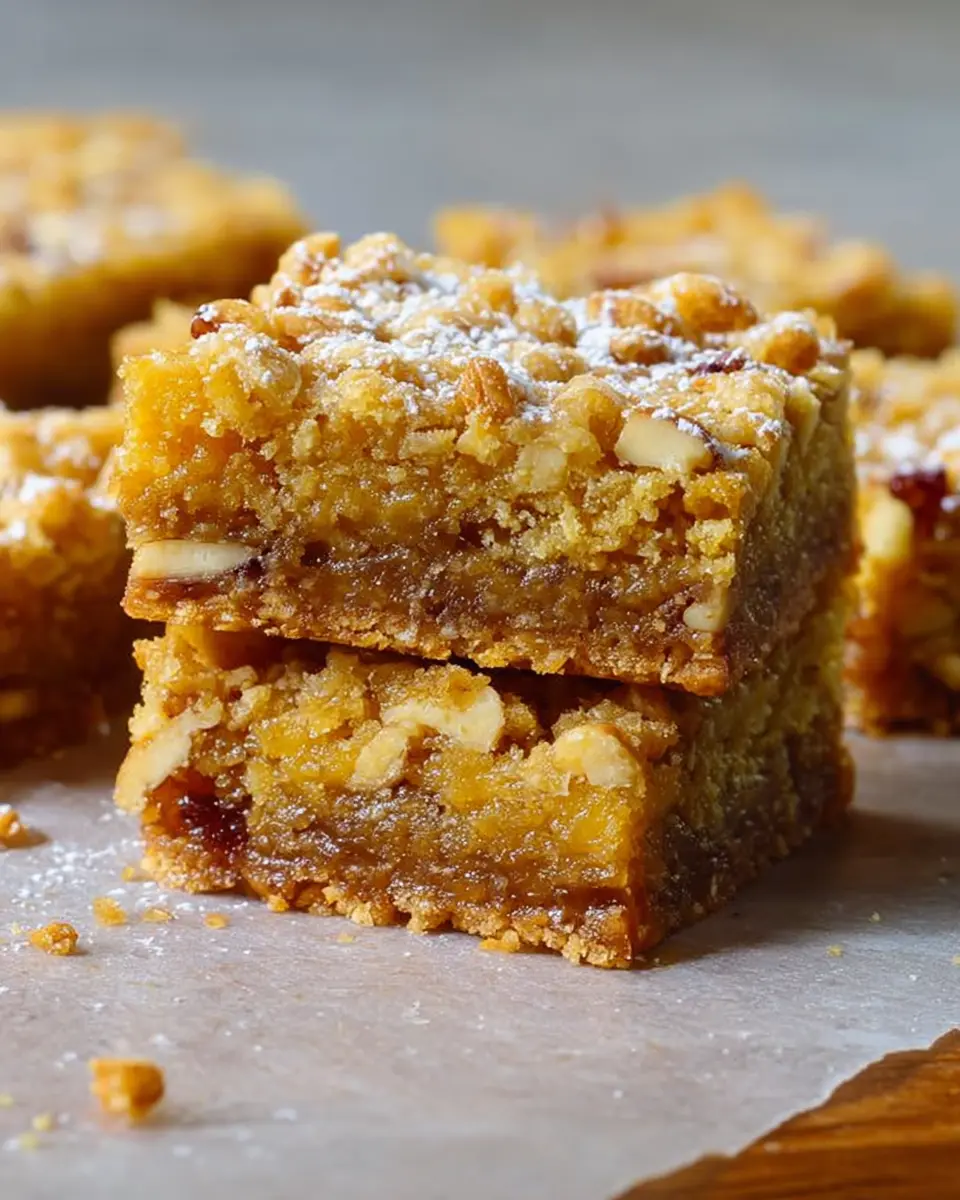
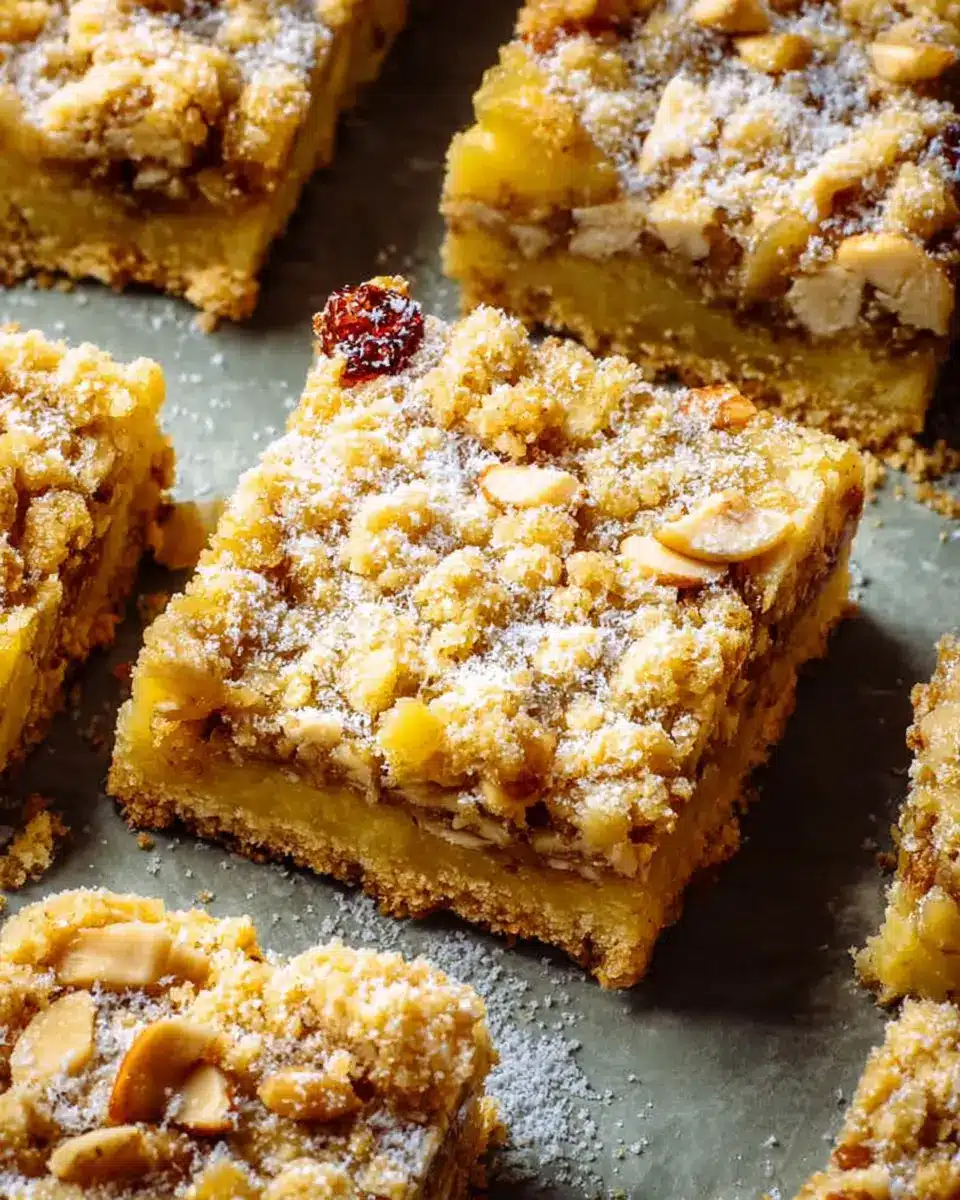
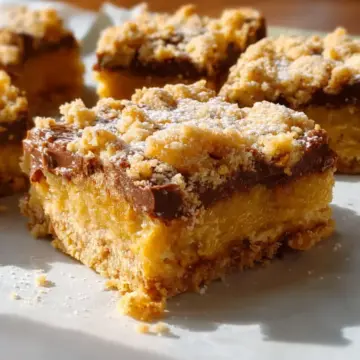
This is where the magic happens! Pour your pineapple filling over the slightly cooled crust and spread it evenly. Crumble the reserved dough over the top of this layer. Baking until the topping is golden brown, about 30 to 35 minutes, is your next step.
Bake and cool
Once baked, place the pan on a wire rack and allow it to cool completely, which usually takes about 2 hours. Patience is key! When ready to serve, gently lift the Sunshine Bliss Bars out using the parchment paper, dust with powdered sugar, and cut into squares.
And there you have it! A deliciously delightful treat ready to brighten your day. Serve these bars at your next gathering, or keep them all to yourself—no judgment here!
Variations on Sunshine Bliss Bars
Looking to shake things up with your Sunshine Bliss Bars? Here are a couple of delightful variations that maintain the spirit of the original while introducing exciting flavors.
Tropical Sunshine Bliss Bars with Coconut
Add a taste of paradise by mixing in shredded coconut to your crust and topping. Just fold in about one cup of sweetened or unsweetened coconut before baking. This will give your bars that delightful tropical flavor and an extra chewy texture that’s sure to impress.
Berry Bliss Bars for a Fruity Twist
If you’re craving a fruity explosion, try swapping out the pineapple filling for a medley of fresh berries. Mix together raspberries, blueberries, and strawberries with a bit of sugar and cornstarch before pouring it onto the crust. This fruity variation not only brightens up the flavor profile but also adds a pop of vibrant color.
For more tips on cooking with fruits and adapting recipes, check out platforms like Serious Eats or Food Network for inspiration!
Cooking Tips and Notes for Sunshine Bliss Bars
Preparing Sunshine Bliss Bars is a delightful experience, and a few handy tips can elevate your baking game.
Keep Your Ingredients Fresh
Using fresh ingredients can make a noticeable difference in flavor. Check the expiration dates on your baking powder and cornstarch to ensure optimal results.
Perfect Crust Texture
When mixing the crust, be careful not to overwork the dough. You want it to be soft, yet firm—perfect for holding that luscious pineapple filling.
Cool Before Serving
It may be tempting to dig in right away, but allowing the bars to cool completely helps set the filling, making slicing easier and more visually appealing.
For even more helpful tips, check out Food Network or Kitchn. Happy baking!
Serving Suggestions for Sunshine Bliss Bars
These Sunshine Bliss Bars are a delightful treat on their own, but pairing them with the right accompaniments can elevate your snack experience. Here are a few suggestions:
-
Fresh Fruit: Slice up some ripe tropical fruits—think mango, kiwi, and strawberries. Their juicy sweetness complements the pineapple filling beautifully.
-
Whipped Cream: Adding a dollop of whipped cream can offer a rich, creamy contrast to the buttery crust.
-
Herbal Tea: A soothing cup of chamomile or peppermint tea pairs wonderfully, balancing the sweetness with herbal undertones.
-
Ice Cream: For a dessert that’s truly indulgent, serve these bliss bars warm with a scoop of vanilla or coconut ice cream. The combination is sure to delight your taste buds!
Feel free to get creative and share how you enjoy your Sunshine Bliss Bars—we'd love to hear your ideas!
Time Breakdown for Sunshine Bliss Bars
Preparation Time
You’ll need about 20 minutes to gather your ingredients and prepare the crust for the Sunshine Bliss Bars. It’s a perfect time to enjoy some upbeat music or a podcast!
Baking Time
The baking process takes a bit longer but is well worth it! Plan for 50 to 55 minutes in total; first, baking the crust for 17 to 20 minutes, then the final bake for 30 to 35 minutes.
Total Time
In total, expect about 2 hours and 15 minutes before you’re ready to cut into these delicious bars—most of that time is for cooling once they come out of the oven! Perfect for a weekend baking session when you can relax and enjoy the aroma of freshly baked goods wafting through your home.
For more tips on crafting the perfect bar treat, check out this resource on bar cookies that might inspire your next baking adventure!
Nutritional Facts for Sunshine Bliss Bars
When indulging in Sunshine Bliss Bars, it’s essential to be aware of their nutritional content. Here's a quick breakdown:
Calories
Each bar contains approximately 175 calories, making it a delightful yet moderate treat for your palate.
Sugar content
With around 12 grams of sugar per serving, these bars contain a touch of sweetness from the pineapple and added sugar, perfect for satisfying cravings.
Fiber
These bars provide about 1 gram of dietary fiber, which contributes to digestive health and keeps you feeling fuller for longer.
Understanding the nutritional facts of Sunshine Bliss Bars helps you enjoy them while being mindful of your overall dietary balance! If you want to learn more about the importance of fiber in your diet, check out this resource.
FAQs about Sunshine Bliss Bars
Can I use fresh pineapple instead of canned?
Absolutely! If you're aiming for a fresher taste, you can substitute fresh pineapple for canned. Just make sure to chop it finely and reduce the moisture by either draining it well or lightly cooking it to avoid making your Sunshine Bliss Bars too soggy.
How do I store leftover Sunshine Bliss Bars?
To keep your delicious Sunshine Bliss Bars fresh, store them in an airtight container at room temperature for up to three days. If you'd like to enjoy them later, consider wrapping them tightly in plastic wrap and aluminum foil and freezing them for up to three months. When you're ready to indulge, simply thaw them at room temperature!
Can I make these bars gluten-free?
Definitely! To make your Sunshine Bliss Bars gluten-free, just substitute the all-purpose flour with a 1:1 gluten-free baking flour. Many brands provide excellent results without sacrificing texture. It's a great way to enjoy a delightful treat while catering to dietary needs.
For more tips, check out resources like King Arthur Baking for gluten-free baking advice.
Conclusion on Sunshine Bliss Bars
Sunshine Bliss Bars are a delightful recipe that brings a burst of tropical flavors right to your kitchen. Perfect for sharing or enjoying solo, these bars are easy to make and even easier to love. Whether it’s a sunny weekend or a cozy evening, they’re sure to brighten your day! For storage tips and serving suggestions, check out our other articles on dessert preservation and pairing ideas. Enjoy your baking!
Sunshine Bliss Bars
Equipment
- 8x8-inch square baking pan
- Parchment Paper
- strainer
- Mixing Bowl
Ingredients
For the crust and topping
- 12 tablespoons unsalted butter, melted and cooled slightly
- 1 teaspoon vanilla extract
- ¾ teaspoon kosher salt
- 2 cups all-purpose flour
- ½ cup granulated sugar
- ¾ teaspoon baking powder
For the pineapple filling
- 20 ounces crushed pineapple in 100% juice
- ½ cup granulated sugar
- 3 tablespoons cornstarch
- ¼ teaspoon kosher salt
- Powdered sugar, for dusting
Instructions
Make the crust
- Heat the oven to 350°F. Line an 8x8-inch square baking pan with 2 sheets of parchment paper, positioning them perpendicular to each other so that the parchment hangs over all 4 sides of the pan to form a sling.
- Stir 1 ½ sticks melted unsalted butter, 1 teaspoon vanilla extract, and ¾ teaspoon kosher salt together in a large bowl until well-combined. Stir in 2 cups all-purpose flour, ½ cup granulated sugar, and ¾ teaspoon baking powder until a soft dough forms and no dry streaks remain.
- Reserve ¾ cup of the dough. Transfer the remaining dough to the baking pan, and press it into an even layer with your hands or a flat-bottomed measuring cup (reserve the bowl).
- Bake until light golden-brown and the top appears dry, 17 to 20 minutes. Let cool slightly, 8 to 10 minutes.
Make the pineapple filling and assemble
- Increase the oven temperature to 375°F. Drain 1 (20-ounce) can crushed pineapple and gently press against the strainer to remove as much liquid as possible (reserve the juice for another use).
- Stir the pineapple, ½ cup granulated sugar, 3 tablespoons cornstarch, and ¼ teaspoon kosher salt together in the now-empty bowl (no need to clean) until combined.
- Pour over the slightly cooled crust and spread into an even layer. Crumble the reserved dough evenly over the filling.
- Bake until the top is golden-brown and the filling is set, 30 to 35 minutes. Place the pan on a wire rack and let cool completely, about 2 hours.
- To serve, grasp the excess parchment and remove the slab from the pan to a cutting board. Dust with powdered sugar and cut into 16 pieces.

Leave a Reply