
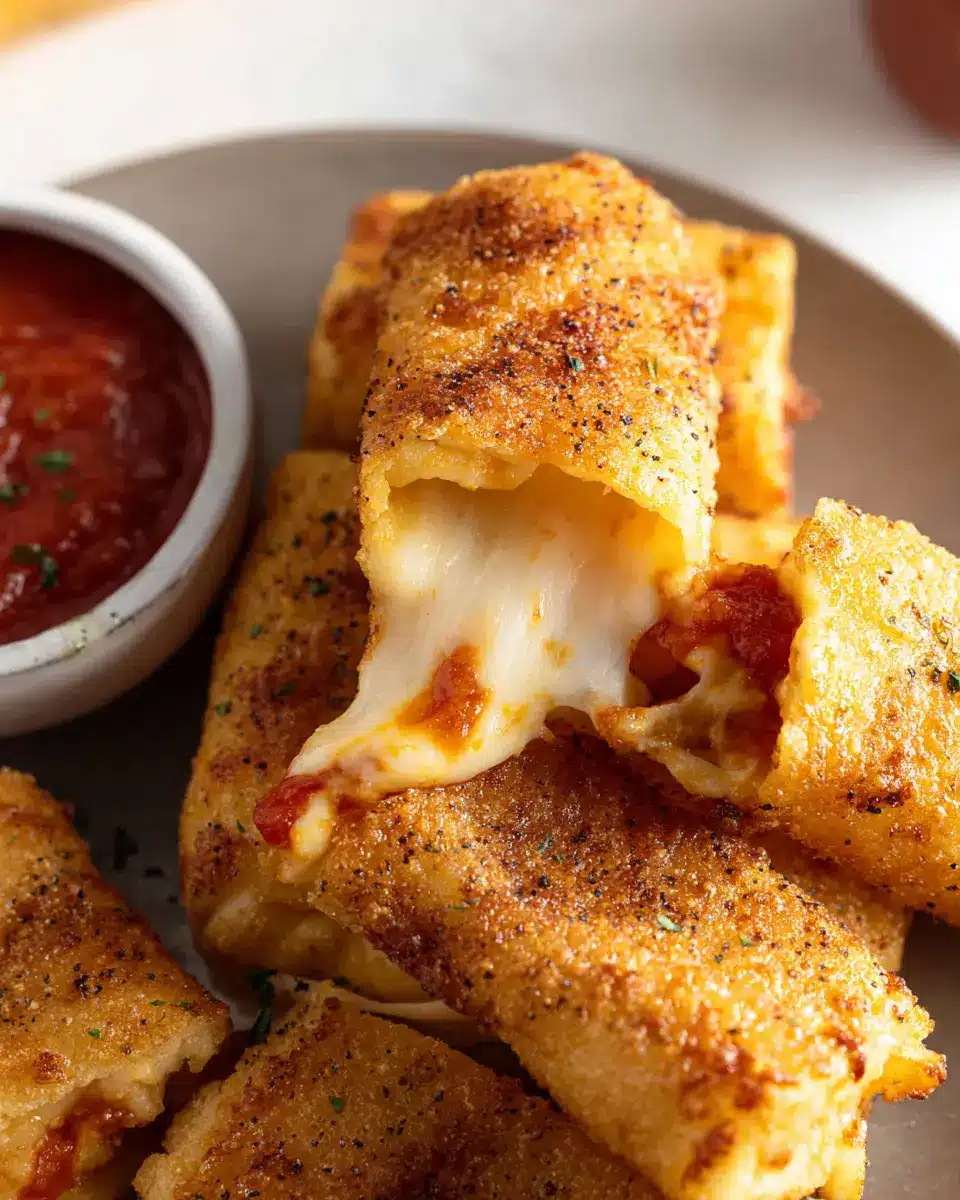
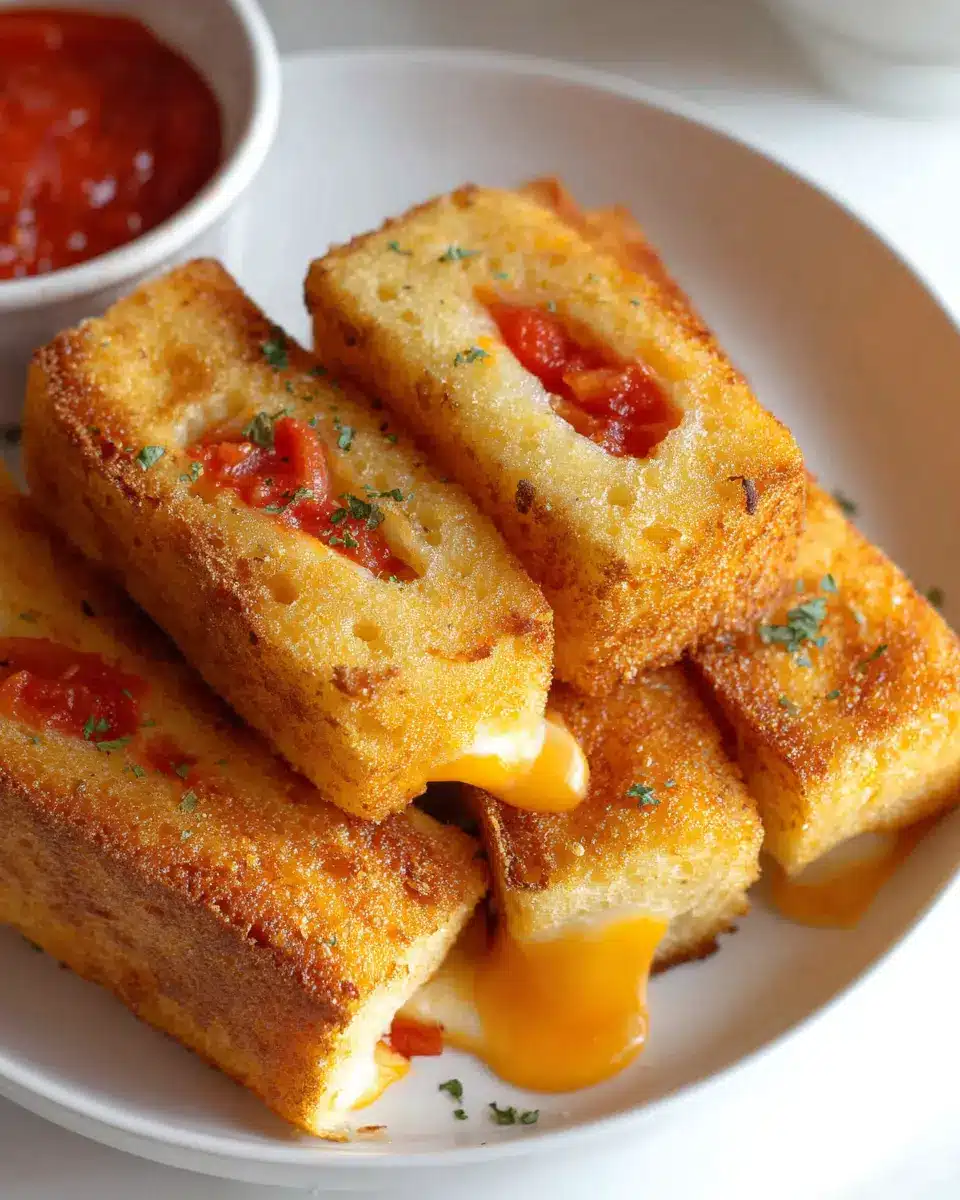
Introduction to Grilled Cheese Roll Ups
When it comes to quick and delightful snacks, grilled cheese roll ups are a game changer. Imagine classic grilled cheese but reimagined as easy-to-handle, bite-sized rolls that pack all that gooey, cheesy goodness. Perfect for an afternoon snack, a party appetizer, or a fun dinner alongside your favorite soup, these roll ups bring joy to any table.
Why Grilled Cheese Roll Ups are the Perfect Homemade Snack
Not only are these little wonders quick to whip up—taking just about 20 minutes from start to finish—but they also cater to a variety of tastes. Whether you're a cheese lover, a dipping enthusiast, or just someone looking for a hearty treat, grilled cheese roll ups have got you covered. You can easily customize them with various cheeses or even add extras like turkey bacon or chicken ham for a satisfying twist.
Check out Food Network's guide to learn more about cheese varieties that can elevate your roll ups. Plus, they’re a hit with kids and adults alike, making them the perfect snack for a gathering or a cozy night in. So grab your ingredients, and let’s get rolling!
Ingredients for Grilled Cheese Roll Ups
When it comes to preparing delicious grilled cheese roll ups, having the right ingredients on hand can make all the difference. Here’s what you’ll need to create this delightful snack.
Essential Ingredients for the Classic Version
To whip up the classic version, make sure you gather the following:
- 8 slices of soft white bread: This forms the perfect base for your roll-ups, making them soft and easy to roll.
- 1 cup of shredded cheddar cheese: Cheddar provides that iconic meltiness and flavor.
- 6 tablespoons of butter, divided: Butter adds a rich, golden crisp to the outside.
These ingredients create a nostalgic, gooey experience that pairs wonderfully with your favorite dipping sauces.
Optional Ingredients for Added Flair
Want to step up your grilled cheese roll ups? Consider these optional ingredients for a fun twist:
- Turkey bacon or chicken ham: Thin slices add protein and flavor without overpowering your dish.
- Sliced tomatoes or avocados: Fresh veggies give a refreshing crunch that perfectly complements the cheesy goodness.
- Spices like garlic powder or paprika: A dash of seasoning can elevate the taste profile, bringing an exciting kick.
Feel free to mix and match according to your taste or pantry supplies! Exploring variations can lead to discovering your favorite combo. Happy cooking!
For more inspiration, check out The Kitchn for additional tips on creative sandwich fillings and pairings.
Step-by-step Preparation of Grilled Cheese Roll Ups
Creating grilled cheese roll ups is not just a recipe; it's an experience filled with deliciousness that's perfect for any gathering or a cozy night in. This fun twist on the classic grilled cheese will have everyone asking for more. Let’s break down the preparation into easy steps, so you can impress your friends with minimal effort!
Gather your tools and ingredients
Before diving into the fun part, let’s make sure you have everything in place. Here’s what you’ll need:
-
Ingredients:
-
8 slices of soft white bread
-
1 cup of shredded cheddar cheese
-
6 tablespoons of butter, divided
-
Options for dipping: marinara sauce, tomato soup, or ranch dressing
-
Tools:
-
A rolling pin
-
Non-stick sauté pan
-
Shallow bowl for melted butter
-
Spatula for flipping
Make sure to have these on hand, as it will streamline your cooking process.
Trim and roll your bread
Start by trimming the crusts off each slice of bread. This step is crucial to achieving that perfect balance and enabling you to roll the bread tightly. After trimming, use a rolling pin to flatten each slice to about ⅛-inch thickness. This not only makes rolling easier but also allows your bread to hold all the cheesy goodness! Do you remember the last time you rolled dough? This step is somewhat nostalgic and therapeutic.
Fill the rolls with cheese
Now comes the cheese – the star of your grilled cheese roll ups! Sprinkle about 2 tablespoons of shredded cheese onto each rolled-out slice of bread, making sure to leave some space at the edges to avoid any spills. Once you’ve done that, roll them up tightly, starting from one end to the other. Secure the rolls gently – no cheese should escape!
Heat the pan and melt the butter
It’s time to make everything golden and crispy. In a large non-stick sauté pan, melt 2 tablespoons of butter over medium heat. While that’s warming up, melt the remaining 4 tablespoons of butter in a shallow bowl in the microwave. This butter bath is essential for giving your grilled cheese roll ups that delectable crunch!
Cook the roll ups to a golden perfection
Once your pan is hot and your butter bath is ready, dip each roll-up into the melted butter and transfer them carefully into the sauté pan. Cook for about 1-2 minutes on each side until they are golden brown and irresistibly crispy. Keep an eye on them—you want that mouthwatering contrast of crispy outside and gooey cheese inside.
And there you go! After you’ve moved them to a serving platter, feel free to pair these delicious bites with your favorite dipping sauces. Enjoy your homemade grilled cheese roll ups; they are sure to become a hit at any gathering!
Want to explore other fun variations? Check out more on The BakerMama or check out ideas for unique dips you can pair your roll ups with.
Variations on Grilled Cheese Roll Ups
Grilled Cheese Roll Ups are a playground for your culinary creativity! Here are a few tasty variations to elevate this classic dish:
Experiment with Different Cheeses
While cheddar cheese is a fan favorite, don’t shy away from trying other varieties. Mozzarella, pepper jack, or even a blend of Swiss and asiago can bring exciting flavors to your roll-ups. Challenge your taste buds and find your perfect cheesy combination!
Add Proteins for Extra Flavor
Boost the heartiness of your grilled cheese roll ups by adding proteins like turkey bacon or chicken ham. These ingredients not only enhance the taste but also make the dish more filling, perfect for a satisfying lunch or dinner.
Incorporate Vegetables for Extra Nutrition
Why not sneak in some veggies for added nutrition? Spinach, bell peppers, or even finely chopped broccoli can blend in beautifully, making your roll ups wholesome without compromising flavor. Plus, you get to increase your daily vegetable intake—win-win!
Feel inspired? Check out this resource for more delicious topping ideas!
Cooking Tips and Notes for Grilled Cheese Roll Ups
Choosing the Right Bread
Selecting the right bread is essential for these grilled cheese roll ups. Soft white bread works wonderfully, but don’t shy away from sourdough or whole wheat for extra flavor and texture. Ensure the bread is fresh and has a bit of elasticity; this helps achieve that perfect roll without cracking. If you're feeling adventurous, you might want to try Ciabatta or French bread for a unique twist!
Ensuring the Perfect Melt
To achieve that ooey-gooey cheese center, opt for a good quality cheese like sharp cheddar or a mix of cheeses for depth of flavor. Shredding your cheese instead of using slices can help it melt more evenly. Additionally, make sure your pan is at a medium heat—too high, and you'll risk burning the outside while the cheese remains unmelted. For even better results, cover the pan for a minute to create steam, further helping the cheese to melt!
For more creative variations, check out resources like Serious Eats or Food Network!

Serving Suggestions for Grilled Cheese Roll Ups
Dipping Sauces that Elevate Your Dish
When it comes to enjoying your grilled cheese roll ups, dipping sauce is a game-changer! Think beyond plain condiments and explore the world of flavors. Classic marinara sauce or smooth tomato soup can add a comforting touch, while spicy ranch dressing provides an exciting kick. Experiment with homemade dips or store-bought options like garlic aioli to find your favorite flavor pairing. Why not whip up a quick herb-infused olive oil for a gourmet twist? Your taste buds will thank you!
Pairing with Side Salads or Soups
Enhance your grilled cheese roll ups with a side salad or a warming bowl of soup for a complete meal. A crisp Caesar salad or a refreshing spinach and strawberry salad can balance the richness of the cheese. If soup is more your style, consider a classic creamy tomato soup or even a savory butternut squash soup. These pairings not only add nutrition but also elevate your dining experience, making it perfect for any lunch or dinner occasion!
Explore more about pairing ideas on sites like EatingWell or The Kitchn for inspiration.
Time Breakdown for Grilled Cheese Roll Ups
Preparation Time
Getting started with your grilled cheese roll ups is a breeze! You'll need about 15 minutes to gather your ingredients and prep the bread. Trim those crusts and roll out your slices like a pro.
Cooking Time
Once you're prepped, cooking these delightful bites takes just 5 minutes. You'll love how quickly they transform from simple ingredients to a melty, golden snack!
Total Time
In a total of 20 minutes, you'll have a delicious platter of grilled cheese roll ups ready to wow your friends or family. Perfect for any occasion, these roll ups are as fast as they are satisfying!
Feeling inspired? While you’re whipping up these tasty roll ups, consider pairing them with a simple marinara sauce for that extra zing. If you’re curious about more quick recipes, check out Food Network’s 5-minute snacks. Happy cooking!
Nutritional Facts for Grilled Cheese Roll Ups
Calories
Each serving of these delicious grilled cheese roll ups contains approximately 250 calories, making them a satisfying yet easy treat for lunch or dinner.
Protein Content
With about 10 grams of protein per serving, these cheesy delights help keep you feeling full and energized throughout your busy day. Cheese is a great source of calcium, contributing to strong bones and overall health.
Dietary Considerations
These grilled cheese roll ups are perfect for vegetarians, and can easily be modified to cater to dietary needs. Swap in gluten-free bread for a gluten-free version, or use dairy-free cheese to create a delightful option for lactose-intolerant friends. For more detailed dietary suggestions, consider exploring resources like the USDA's MyPlate for balanced meals.
Be sure to enjoy these roll-ups with your favorite dip to enhance both flavor and nutrition!
FAQs about Grilled Cheese Roll Ups
Can I make them in advance?
Absolutely! You can prepare your grilled cheese roll ups ahead of time and store them in the fridge. Just roll them up and keep them in an airtight container. To enjoy, simply heat them in a skillet or microwave until warm and crispy.
What’s the best way to store leftovers?
If you find yourself with leftover grilled cheese roll ups, store them in an airtight container in the fridge for up to two days. For longer storage, consider freezing them—just be sure to wrap them tightly in plastic wrap, then place them in a freezer-safe bag. When you're ready to eat, thaw and reheat in a pan for best results.
Any tips for making them healthier?
You can easily make your grilled cheese roll ups healthier by:
- Using whole grain or gluten-free bread
- Choosing low-fat cheese options
- Adding some veggies, like spinach or bell peppers, inside the roll ups for an extra nutrition boost
For more tips and healthy variations, check out this article on healthier grilled cheese options. Enjoy experimenting with your favorite flavors while keeping it nutritious!
Conclusion on Grilled Cheese Roll Ups
A Fun and Easy Snack for Busy Professionals
Grilled cheese roll ups are a delightful and quick snack perfect for busy professionals. With minimal prep and cook time, they make an ideal treat for those working long hours or balancing a hectic lifestyle. Pair them with your favorite dip to elevate this simple comfort food further. Enjoy the satisfaction of a satisfying, homemade snack in a fraction of the time!

Grilled Cheese Roll Ups
Equipment
- non-stick saute pan
- rolling pin
- shallow bowl
Ingredients
- 8 slices soft white bread
- 1 cup shredded cheddar cheese
- 6 tablespoons butter divided
- marinara sauce, tomato soup or ranch dressing for dipping, if desired
Instructions
- Trim the crusts from each slice of bread. Roll one slice out to about ⅛-inch thickness with a rolling pin. Sprinkle the rolled out slice with about 2 tablespoons shredded cheese. Roll up tightly. Repeat with remaining bread slices and shredded cheese.
- Place 2 tablespoons butter in a large non-stick saute pan and melt over medium heat.
- Melt remaining 4 tablespoons butter in a shallow bowl in the microwave. Dip one roll up at a time in the melted butter in the shallow bowl and then transfer to the saute pan. Allow roll ups to saute for 1-2 minutes per side until golden brown and buttery crisp on the outside. Remove to a serving platter.
- Serve with tomato sauce, tomato soup or ranch dressing for dipping, if desired.


Leave a Reply